Post A Tweet Using Twitter API
Table Of Contents
Growing a business requires a lot of effort, including working on social media to attract attention and promote your product to end users.
Therefore, it is necessary to automate as much as possible so that you do not have to spend all your time preparing posts and replying to comments manually.
If you have been using Twitter for a long time, you may have noticed the large number of bots floating around.
So why not create your own?
Prerequisites
Before we move on to programming, we need to create a Twitter application that will give us what we need to integrate with the Twitter API.
#1 - Create A Twitter Application
First, log in to the Twitter developer's portal with the account from which you want to post a tweet.
Then click on the "Developer Portal" link in the upper right corner.
Once you enter it, click on "Projects & Apps" -> "Overview" -> "Create App".
Enter the required details of the application and at the end you will see a set of keys on the screen, but you should not copy them yet as they would change later.
#2 - Update Application's Permissions
Next, scroll down to the "App permissions" section:

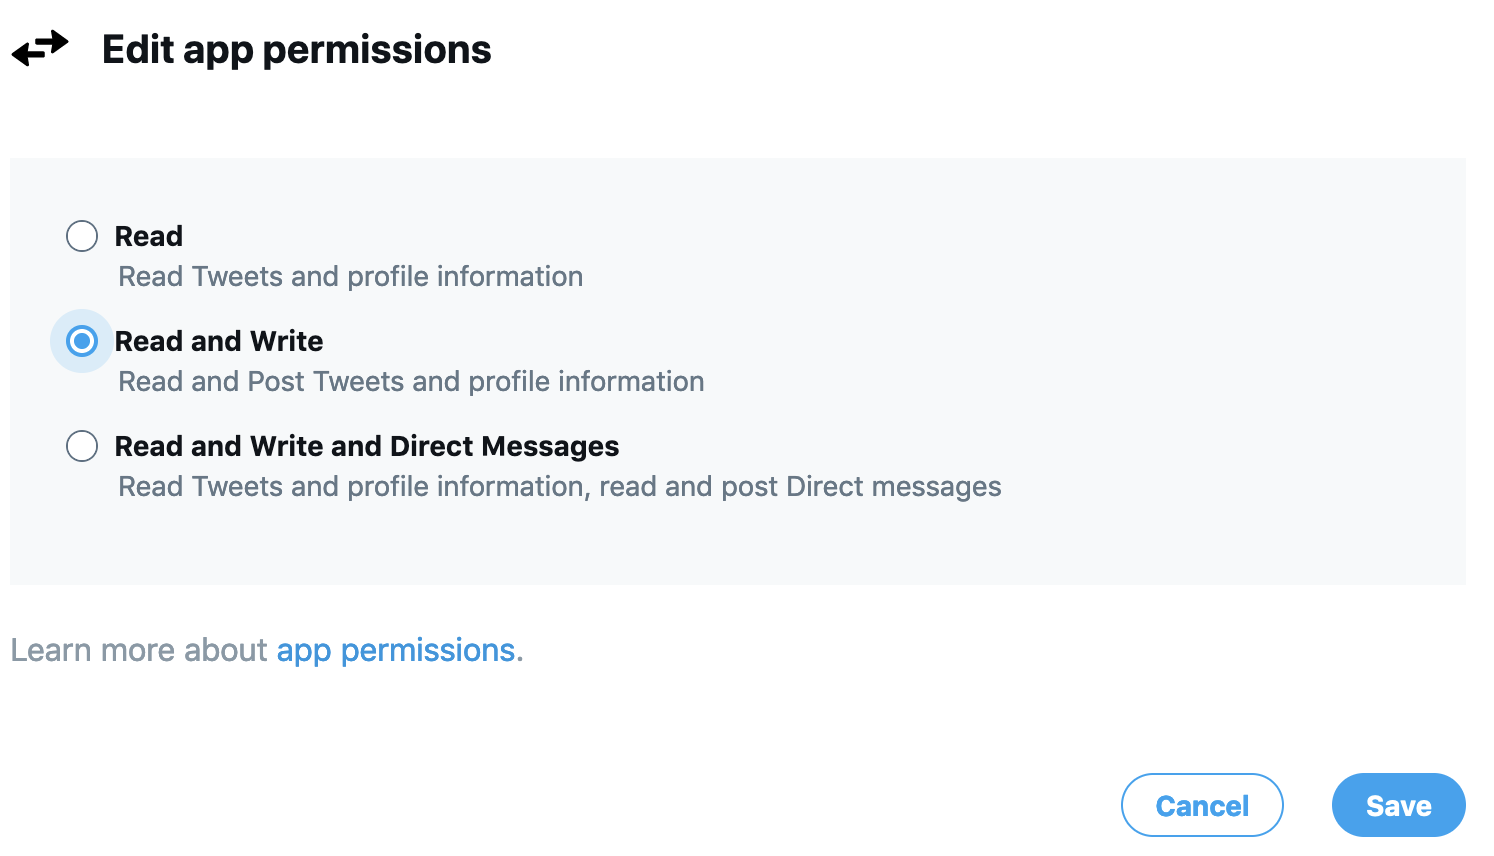
Click "Edit" and switch to "Read and Write" in order to allow our application to post tweets on your behalf:

Click "Save", confirm the change and verify it:

#3 - (Re)generate Tokens
Click on "Keys and tokens" on the right side of "Settings" and regenerate "Api Key and Secret" since we didn't copy them from any of the previous screens:

Confirm the action and you will see a modal with the keys.
Save them somewhere on your computer for later use.
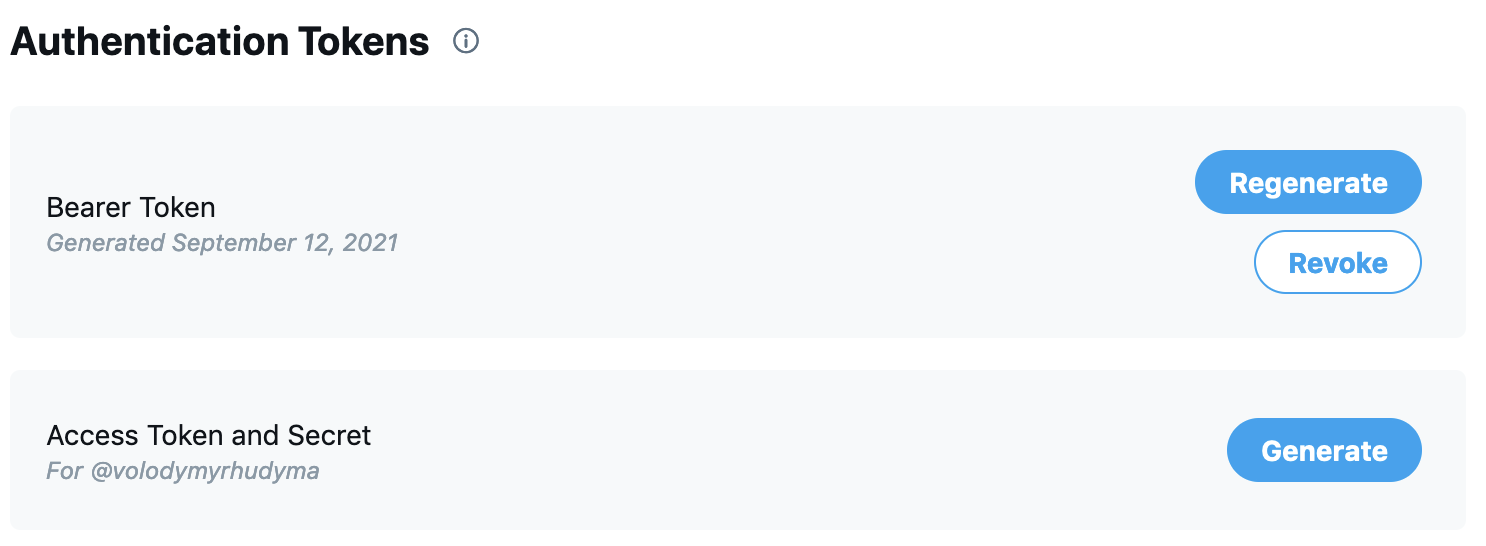
Next, regenerate "Access Token and Secret" as the old tokens were valid for the old permissions (Read), now they have been changed to "Read and Write".
If you do not have a "Regenerate" button like on the screenshot below, just click "Generate" and it will still be perfectly fine:

Save them and move on.
Important note: It should be instantly seen that "Access Token and Secret" have been created with "Read and Write" permissions:

Finally we have everything to move on to the most fun part of this tutorial - coding.
We are going to create a Node.js application, since it is not safe to integrate directly with the Twitter API from within the React application.
Why? Because we need to use all generated tokens, keys and secrets and it is not safe to store them on the client side, as in this case they will be visible to everyone, which is definitely not what we want.
We need a Proxy API that communicates with the Twitter API and stores all the sensitive data for us.
Twitter API Integration
Initialize a new project with the default settings:
npm init -y
Install the Twitter client for Node:
yarn add twit
And a module that loads environment variables from the .env file into process.env:
yarn add dotenv
That's it. Now create the .env file in the root of your project with the following content:
API_KEY=
API_SECRET=
ACCESS_TOKEN=
ACCESS_TOKEN_SECRET=
Add the saved keys to the above file and save it.
Next, create index.js file in the root of your project and import the installed dependencies:
const Twit = require("twit");
const dotenv = require("dotenv");
dotenv.config();
The next step is to create a Twitter client and pass all the keys as parameters:
// ...

const T = new Twit({
  consumer_key: process.env.API_KEY,
  consumer_secret: process.env.API_SECRET,
  access_token: process.env.ACCESS_TOKEN,
  access_token_secret: process.env.ACCESS_TOKEN_SECRET,
});
Finally, create a function responsible for integrating with the Twitter API and sending a tweet:
// ..

const tweet = () => {
  const text = "Hey!";

  const onFinish = (err, reply) => {
    if (err) {
      console.log("Error: ", err.message);
    } else {
      console.log("Success: ", reply);
    }
  };

  T.post("statuses/update", { status: text }, onFinish);
};

tweet();
And that's it!
We used "statuses/update" method, described in the official documentation.
Read it to find out what other parameters we could have used to create a tweet that contains even more information than just a simple text.
Finally, open the package.json file and add a new script to run an application:
// ...

"scripts": {
  "start": "node ./index.js",
  // ...
},

// ...
Verify The Result
To verify the result, run the application:
yarn start
If no errors are displayed in the console, open Twitter, navigate to your profile and see a newly created tweet:

Pretty cool, isn't it?
Imagine what else you could do with the Twitter API, which is really easy-to-use and well documented.
Summary
Congratulations on creating your first Twitter Bot, which posts a tweet for you.
I recommend you to read the official Twitter API documentation and play around with the Twitter API to see what else can be automated to benefit your business.
Most other social networks have their own APIs and enable similar things.
So if you know one (Twitter), you know how to deal with others.